
Freecom FSG-3 is a small device with these specs:
- Intel IXP425/IXP422 (ARM) CPU, running at 266 MHz
- 64 MB RAM
- 1 - WAN port and 3 - LAN ports
- 4 USB ports
- 1 eSATA port
- HDD, ranging from 80 GB to 500 GB (depending on model)
If the original firmware is too little for you, you can run a full Linux distribution on FSG-3, like Debian (little-endian ARM port).
Overview
The process of installing Debian on a FSG-3 needs these steps:
- you need a USB-stick with a custom system (available in downloads)
- you need to flash a new kernel and a new bootloader configuration
- you need to reboot FSG-3 - the system will boot from a custom USB-stick, you will be able to install Debian
You don't need to open the device.
Certainly, you also need some Linux knowledge.
Although it's not likely to brick the device if you understand and follow this HOWTO carefully - it can always happen. It's your risk, and you're the only person responsible. Don't blame me for that.
You can always repair the bricked device using a serial cable and/or JTAG.
We use "original FSG-3" when we refer to a new FSG-3 with original firmware.
We use "custom FSG-3" when we refer to a FSG-3 on which we already flashed a new kernel and a new bootloader configuration.
The kernel we flash contains a minimal initramfs. When kernel boots from flash, it tries to detect if there is any USB mass-storage device connected, tries to mount /dev/sdb2, checks if it has a /etc/emergency file there. If all conditions are met, the kernel tries to boot the operating system from that device.
This means that you can always boot the system from the USB-stick and repair it if you need.
USB-stick preparation
You need to have a USB stick of at least 256 MB. You need to set up two primary partitions on it (sda - USB stick):

Why this layout? It will match the layout on HDD.
Uncompress and copy the contents of fsg-3-deploy-stick.tar.bz2 to the ext3 partition (/dev/sda2) of the USB-stick. fsg-3-deploy-stick.tar.bz2 is available in downloads.
Configuration on the original FSG-3
- Log in to your new FSG-3 box via a web interface (user: admin, password: admin):
- Enable SSH in Services -> SSH server -> run SSH server -> Apply
- Login via SSH, and su to root (below, the passwords are shown):
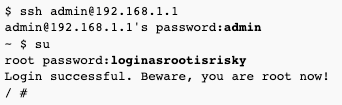
Note that you can use the passwd command here to change the root password to something easier to remember.
- The process needs that we flash a kernel and a new bootloader config.
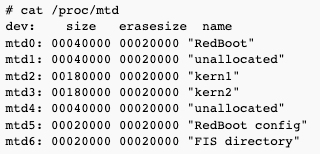
Make sure your MTD partition layout is like below:
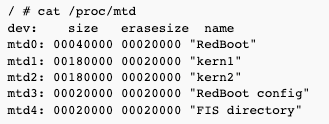
/ # cat /proc/mtd dev: size erasesize name mtd0: 00040000 00020000 "RedBoot" mtd1: 00180000 00020000 "kern1" mtd2: 00180000 00020000 "kern2" mtd3: 00020000 00020000 "RedBoot config" mtd4: 00020000 00020000 "FIS directory"
This layout has been verified correct for firmware versions 3.3.9, 3.3.14 and 4.1.6 - please check carefully if you are running other firmware versions.
Each MTD partition needs an explanaton:
"RedBoot" is /dev/mtd0, it's RedBoot bootloader, don't touch it.
"kern1", or /dev/mtd1, is the original FSG-3 kernel, also, don't touch it.
"kern2", or /dev/mtd2, is empty; this is where we'll flash our kernel.
"RedBoot config", or /dev/mtd3, is where the configuration of RedBoot is kept. Here we'll flash our own bootloader config.
"FIS directory", or /dev/mtd4, stands for Flash Image System, and also, don't touch it.
Note that after we flash a new kernel, the partition layout will change - the new kernel sees unallocated space on flash as separate place (you can put custom things there).
Also, because flashing is a dangerous process if we do it wrongly, and newer FSG-3 models can theoretically have MTD partition layout changed - we want to inspect the contents of the bootloader configuration ("RedBoot config"):

The first line marked in bold tell that by default, the bootloader loads the kernel from "kern1", in our case, /dev/mtd1. This means, we can safely flash a new kernel on "kern2" (/dev/mtd2).
The second line are the options passed to the kernel. The root= line will refer to either /dev/hda1 or /dev/hda2 depending on how many times you have updated the firmware (it alternates each time). Note that the /dev/hda1 will be /dev/sda1 in version 4.x firmware.
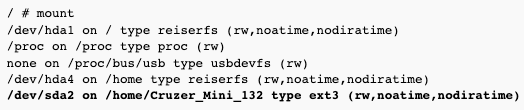
- Now, we'll flash a new kernel. Connect the USB-stick. You will notice that it was automatically mounted (/dev/sda2 for version 3.x firmware, and /dev/sdb2 for version 4.x firmware):
(For version 4.x firmware, replace /dev/hda[1-4] with /dev/sda[1-4] and /dev/sda2 with /dev/sdb2)
Our USB-stick was mounted in /home/Cruzer_Mini_132. We go to a directory containing a kernel and a new bootloader configuration:

You need to erase kernel partition's contents first:

...and flash a kernel:

Next, flash a new RedBoot config, which will start FSG-3 using a new kernel.
WARNING: This will permanently change the MAC addresses of your WAN and LAN ethernet interfaces (as those values are stored in the Redboot config partition).
/dev/mtd3 is smaller, and that's why we use different erase options:


- If everything's fine, you may reboot. Your system will boot from USB-stick.
/home/Cruzer_Mini_132/root/deploy # reboot
The system is going down NOW !! Sending SIGTERM to all processes. Connection to 192.168.1.1 closed by remote host. Connection to 192.168.1.1 closed.
Shortly, you should see USB-stick flashing and blinking as it loads the system.
Configuration on the custom FSG-3
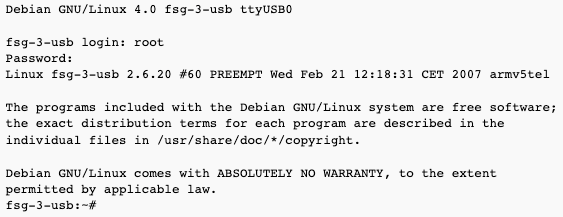
Log in to FSG-3 running Debian on USB-stick (password is toor) - IP is 192.168.111.188/255.255.255.192 (make sure you have proper netmask on the machine you are connecting from):

Another possiblility is to use a USB-serial cable - connect the serial part to your PC, and USB part to the FSG-3.
Port settings are:
Bps/Par/Bits : 115200 8N1
Hardware Flow Control : No
Software Flow Control : No
Now, do these things:
- create two primary partitions on /dev/sda (HDD): /dev/sda1 (swap) and /dev/sda2 (ext3)
- mount /dev/sda2
- copy and uncompress
fsg-3-deploy-stick.tar.bz2on HDD (make sure /bin, /etc, /dev will be at the top of that device) - halt FSG-3
- unplug USB-stick
- power on FSG-3 - it will boot from HDD - welcome to Debian on FSG-3.
Downloads
fsg-3-deploy-stick.tar.bz2 - a customized minimal Debian (ARM, LE)
Size: 66530995 bytes
md5sum: a8d31c29614b6a21505febdef9ec74a7
Please see http://lists.wpkg.org/pipermail/debian-non-standard/2008q2/000114.html for a security note.
initramfs - initramfs embedded in the kernel
Size: 57429 bytes
md5sum: 02622575d83bf69e1d8c5a0c9c32b6b8
Troubleshooting
flash partition layout
The new kernel will see a different flash partition layout - it sees unallocated space on flash as separate partitions (you can put custom things there).
New kernel:

Old kernel:
Here's a small table that summarizes the change:
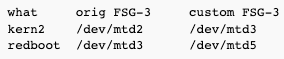
Don't forget about it if you want to change the kernel in the future!
controlling fan
This one disables fan:

This one sets fan at full speed:

You can also choose any other value between 0 and 255.
You can use it in your shutdown scripts (don't forget to disable the HDD, too).
Note that disabling fan during normal work can be dangerous!
LEDs, buttons
Currently, they don't work.
See NSLU2 mailing lists for an update on that.
kexec
The kernel has kexec support. This means, you don't have to flash a kernel if you want to boot it: it's enough to load and execute a new kernel:
fsg-3-usb:~/deploy/kernels/2.6.20# kexec -l zImage fsg-3-usb:~/deploy/kernels/2.6.20# kexec -e (wait a minute or so... you will be able to login again once the device boots again)
kernel
The kernel was built from NSLU2 svn kernel trunk (revision 695 from 14-Feb-2007).
If you want to build a new kernel, you can use the config in /proc/config.gz.
Important!
The device starts in big-endian mode, but this kernel runs in little-endian mode. This means, that any LE kernel you write on flash needs to have bytes swapped. If you use NSLU2 build, it will be done by default - vmlinuz-fsg3-2.6.20-arm will be the file you want to flash.
If you're unsure, don't flash the kernel anymore, use kexec to load a new kernel (and adjust your startup scripts appropriately to start kexec just once) - it's way safer.
initramfs
The kernel used here contains an embedded initramfs: it starts after the kernel is executed, and tries to detect if there is a USB-storage device connected, and if yes, if it contains /etc/emergency file (can be empty).
If both conditions are met, the kernel will try to boot from USB-storage device (USB-stick etc.) - this can be handy if you screw your filesystem, and you want to boot from another device.
If you want to use it with your custom kernel, download initramfs.tar.bz2 from the downloads section, uncompress it, and make sure your .config points where initramfs files are:

compiling custom kernel modules
To compile custom kernel modules:
- download kernel 2.6.20
- unpack it to /usr/src/linux-2.6.20
- uncompress /proc/config.gz to /usr/src/linux-2.6.20
- make oldconfig
- make menuconfig
All that on your FSG running Debian of course.
wireless
If your model didn't have a wireless card when you bought it, it has been reported that Atheros mini-PCI cards work fine with FSG-3.
If you want to use madwifi, you will have to compile it yourself. If it's too difficult for you, see Atheros on FSG-3.
other
For other troubleshooting ideas, see troubleshooting Debian on ASUS WL-500g Deluxe / Premium.
Device currently shipped seem to have marvel based wifi cards
Contact and support
If you have any questions, please subscribe to the mailing list on http://lists.wpkg.org/mailman/listinfo/debian-non-standard
For general debian-arm info, please ask at debian-arm mailing list.
For more specific questions, try NSLU2 mailing lists: http://www.nslu2-linux.org/wiki/Main/MailingLists
To make sure Debian is well supported on arm architecture, please participate in Debian Popularity Contest. To do it, install popularity-contest package: